Having trouble with your built-in ice maker? Don’t worry, we’ve got you covered! In this article, we will walk you through some common issues that you might encounter with your ice maker and provide easy troubleshooting tips to get your ice production back on track. From sluggish ice production to mysterious leaks, we’ll tackle it all and help you enjoy ice-cold beverages without any hassle. So let’s jump right in and solve those ice maker problems together!
This image is property of www.selecthomewarranty.com.
Water Leakage
Check water supply line
If you notice water leaking from your built-in ice maker, the first thing to check is the water supply line. Ensure that the water supply line is securely connected to the ice maker and that there are no leaks or cracks. If you find any issues with the water supply line, you may need to replace it to prevent further leakage.
Inspect inlet valve
Another possible cause of water leakage is a faulty inlet valve. The inlet valve regulates the water flow into the ice maker, and if it is malfunctioning, it can cause water to leak. Inspect the inlet valve for any signs of damage or clogging. If you notice any issues, such as a cracked or broken valve, it will need to be replaced.
Examine water filter
A clogged water filter can also lead to water leakage in your ice maker. Over time, the water filter can accumulate debris and become blocked, causing water to overflow. Check the water filter and clean or replace it if necessary. Regularly replacing the water filter can help prevent water leakage issues.
Inspect water line connections
Check the connections between the water line and the ice maker to ensure they are tight and secure. Loose connections can result in water leakage. If you find any loose or damaged connections, tighten or replace them as needed. Properly securing the water line connections can help prevent any further water leakage.
Check for frozen water line
In colder climates or during winter months, a frozen water line can be the culprit behind water leakage in your ice maker. Check the water line for any signs of freezing, such as ice buildup or a lack of water flow. If you suspect a frozen water line, you can try using a hairdryer to thaw it out. Additionally, insulating the water line can help prevent future freezing and water leakage issues.
Ice Maker Not Producing Ice
Verify freezer temperature
If your built-in ice maker is not producing ice, the first thing to check is the temperature of the freezer. The freezer should be set to a temperature between 0 and 5 degrees Fahrenheit (-18 to -15 degrees Celsius) for the ice maker to function properly. If the temperature is too high, adjust the freezer settings accordingly and allow time for it to reach the optimal temperature.
Check shut-off arm
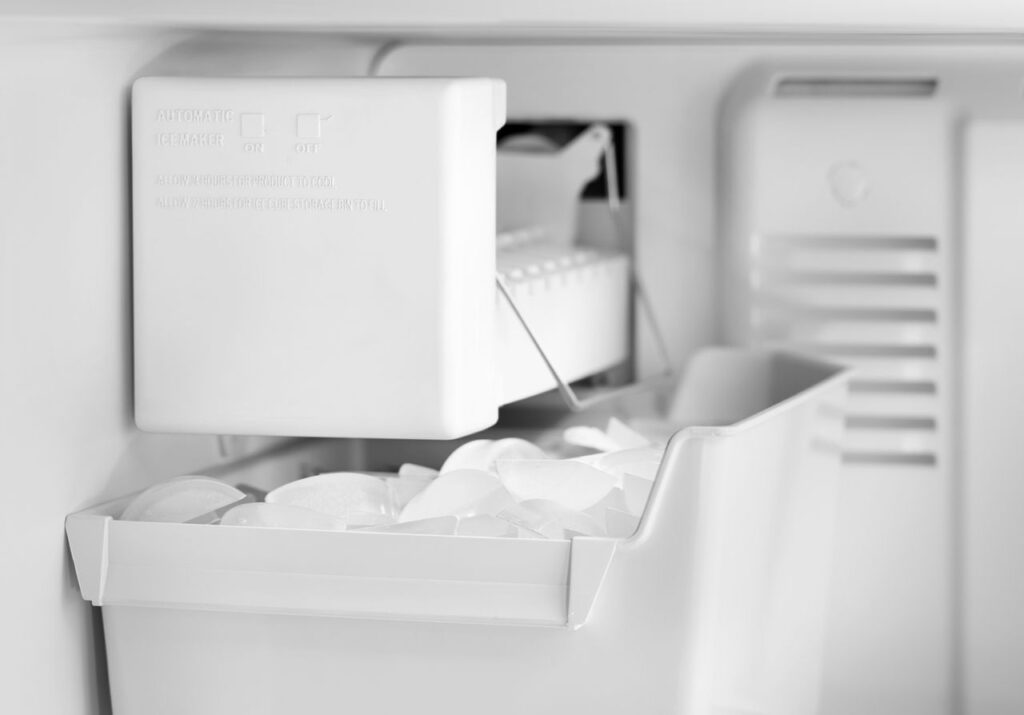
The shut-off arm is a mechanism that detects when the ice bin is full and stops the ice maker from producing more ice. If the shut-off arm is stuck in the raised position or not properly aligned, it can prevent the ice maker from producing ice. Ensure that the shut-off arm moves freely and is correctly positioned. Adjust or fix any issues with the shut-off arm as necessary.
Examine water inlet valve
A faulty or clogged water inlet valve can also be the reason why your ice maker is not producing ice. Inspect the water inlet valve for any signs of damage or blockage. If the valve is damaged or clogged, it may need to be replaced. Cleaning the valve can sometimes solve the issue, but if the problem persists, a replacement may be necessary.
Clean the ice mold
Over time, mineral deposits or a buildup of debris can accumulate in the ice mold, preventing the ice maker from producing ice. Carefully remove the ice mold from the ice maker and clean it thoroughly. Use warm water and a mild cleaning solution to remove any deposits or debris. Once cleaned, reinstall the ice mold and monitor if the ice maker starts producing ice.
Inspect water filter
A clogged or dirty water filter can also hinder the ice maker’s ability to produce ice. Check the water filter and clean or replace it if needed. A clean water filter ensures that the water entering the ice maker is free from impurities and allows for proper ice production.
This image is property of paradiseapplianceservice.com.
Ice Maker Not Dispensing Ice
Check for ice blockage
If your ice maker is producing ice but not dispensing it, the most common issue is an ice blockage. Check the ice bin and dispenser chute for any ice buildup that may be blocking the ice from being dispensed. Thoroughly remove any ice blockage and ensure that the ice bin is properly aligned.
Inspect auger motor
The auger motor is responsible for pushing the ice from the ice bin to the dispenser chute. If the auger motor is malfunctioning, it can prevent the ice from being dispensed. Inspect the auger motor for any signs of damage or wear. If the motor is faulty, it may need to be replaced to resolve the issue.
Examine dispenser actuator
The dispenser actuator is the mechanism that activates the ice dispenser when you press the lever or button. If the actuator is not functioning correctly, it can prevent the ice from being dispensed. Inspect the dispenser actuator for any obstructions or damage. Clear any blockages and ensure that the actuator is aligned properly.
Verify dispenser control board
The dispenser control board controls the operation of the ice dispenser. If the control board is faulty or damaged, it can affect the ice dispensing function. Verify the dispenser control board for any visible signs of damage or loose connections. If necessary, replace the control board to restore proper ice dispensing.
Clean or replace dispenser chute
A dirty or clogged dispenser chute can impede the ice dispensing process. Over time, debris or ice buildup can accumulate in the dispenser chute, blocking the ice from being dispensed. Clean the dispenser chute thoroughly, removing any obstructions or buildup. If the chute is damaged, it may need to be replaced.
Ice Cubes Too Small or Misshapen
Inspect water inlet valve
If your ice cubes are coming out small or misshapen, it may indicate an issue with the water inlet valve. Ensure that the water inlet valve is fully open and allowing a sufficient amount of water to enter the ice maker. If the valve is partially closed or blocked, it can affect the ice cube size and shape. Clean or replace the water inlet valve if necessary.
Check water pressure
Inadequate water pressure can also lead to small or misshapen ice cubes. Check the water pressure in your home and ensure that it meets the requirements for the ice maker. If the water pressure is too low, consider installing a water pressure regulator or contacting a professional plumber to address the issue.
Examine water filter
A clogged water filter can restrict water flow and affect the size and shape of the ice cubes. Check the water filter and clean or replace it as needed. A clean water filter ensures that the water entering the ice maker is free from impurities and allows for proper ice cube formation.
Verify ice mold thermostat
The ice mold thermostat regulates the temperature at which the ice cubes form. If the thermostat is not functioning correctly, it can result in small or misshapen ice cubes. Verify the ice mold thermostat for any signs of damage or malfunction. Replace the thermostat if necessary to ensure proper ice cube formation.
Clean or replace water inlet tube
A blockage in the water inlet tube can also affect the size and shape of the ice cubes. Carefully remove the water inlet tube and check for any debris or blockages. Clean the tube thoroughly or replace it if there are any signs of damage or clogging. A clear water inlet tube allows for proper water flow and helps maintain the desired ice cube size.
This image is property of kitchenaid-h.assetsadobe.com.
Ice Maker Making Odd Noises
Check for ice buildup
If your ice maker is making unusual noises, it could indicate an ice buildup issue. Ice can accumulate in various parts of the ice maker, causing loud or strange noises during operation. Check for any ice buildup in the ice bin, dispenser chute, or other components. Thoroughly remove any ice buildup and ensure that all parts are clear.
Inspect evaporator fan motor
The evaporator fan motor circulates the air within the ice maker, ensuring proper cooling. If the motor is faulty or damaged, it can create unusual noises. Inspect the evaporator fan motor for any signs of wear or malfunction. If necessary, replace the motor to eliminate the noise.
Examine condenser fan motor
The condenser fan motor is responsible for cooling the condenser coils, which help maintain the proper operating temperature of the ice maker. If the fan motor is not functioning correctly, it can result in strange noises. Examine the condenser fan motor for any visible signs of damage or obstruction. Replace the motor if necessary to resolve the noise issue.
Verify compressor
A faulty or malfunctioning compressor can also contribute to strange noises coming from the ice maker. Verify the compressor for any signs of damage or malfunction. If you suspect an issue with the compressor, it is best to contact a professional technician to diagnose and repair the problem.
Clean or replace water line regulator
The water line regulator helps control the water flow into the ice maker. If the regulator is not functioning properly, it can lead to noisy operation. Clean the water line regulator and ensure that it is correctly adjusted. If the problem persists, consider replacing the regulator to eliminate the noise.
No Power to Ice Maker
Check electrical connections
If your ice maker is not receiving power, start by checking the electrical connections. Ensure that the ice maker is properly plugged into a functioning outlet. Verify that the power cord is not damaged or frayed. If there are any loose or faulty connections, secure or replace them as necessary.
Verify power supply
Check if there is power supply to the outlet where the ice maker is plugged in. Test the outlet with another device to confirm if it is working properly. If there is no power supply to the outlet, check the circuit breaker or fuse box and reset or replace as needed. Ensuring a stable power supply is essential for the ice maker to function correctly.
Examine control module
The control module is responsible for controlling various functions of the ice maker. If the control module is malfunctioning, it can result in a lack of power to the ice maker. Examine the control module for any signs of damage or loose connections. If necessary, replace the control module to restore power to the ice maker.
Check for burnt components
Inspect the internal components of the ice maker for any signs of burn marks or damage. Burnt components can indicate a power surge or electrical issue that caused the ice maker to lose power. If you notice any burnt components, it is recommended to contact a professional technician to assess and repair the electrical damage.
Replace ice maker heater
The ice maker heater plays a crucial role in preventing ice cubes from sticking together. If the heater is faulty or damaged, it can result in a lack of power to the ice maker. Verify the ice maker heater for any signs of malfunction or damage. If the heater is not working properly, it will need to be replaced to restore power to the ice maker.

This image is property of www.kitchenaid.com.
Excessive Ice Buildup
Inspect water inlet valve
Excessive ice buildup can occur due to a faulty water inlet valve. Check the water inlet valve for any signs of damage or blockage. A malfunctioning valve may continuously release water into the ice maker, resulting in excessive ice formation. Replace the water inlet valve if necessary to prevent further ice buildup.
Check water pressure
Inadequate water pressure can also contribute to excessive ice formation. Ensure that the water pressure in your home is sufficient for the ice maker to function properly. If the water pressure is too low, consider installing a water pressure regulator or contacting a professional plumber to address the issue.
Examine ice mold thermostat
The ice mold thermostat regulates the temperature at which the ice cubes form. If the thermostat is not functioning correctly, it can result in excessive ice buildup. Verify the ice mold thermostat for any signs of damage or malfunction. Replace the thermostat if necessary to prevent excessive ice formation.
Verify defrost thermostat
A malfunctioning defrost thermostat can disrupt the ice maker’s defrosting cycle and cause excessive ice buildup. Check the defrost thermostat for any signs of damage or malfunction. If the thermostat is faulty, it may need to be replaced to prevent further ice accumulation.
Clean or replace water inlet tube
A clogged or damaged water inlet tube can hinder the flow of water into the ice maker, leading to excessive ice buildup. Carefully remove the water inlet tube and check for any debris or blockages. Clean the tube thoroughly or replace it if there are signs of damage or clogging. Ensuring a clear water inlet tube will help prevent excessive ice formation.
Ice Maker Overflows
Check water inlet valve
If your ice maker is overflowing, the water inlet valve may be the culprit. Inspect the water inlet valve for any signs of damage or blockage. A faulty valve can allow too much water into the ice maker, causing it to overflow. Replace the water inlet valve if necessary to prevent further overflow issues.
Inspect water pressure
Inadequate water pressure can also contribute to ice maker overflow. Check the water pressure in your home and ensure it meets the requirements for the ice maker. If the water pressure is too high, consider installing a water pressure regulator or contacting a professional plumber to address the issue.
Examine ice mold thermostat
The ice mold thermostat regulates the length of the ice-making cycle. If the thermostat is not functioning properly, it can result in excessive ice production and subsequent overflow. Verify the ice mold thermostat for any signs of damage or malfunction. Replace the thermostat if necessary to prevent further overflow.
Verify fill tube
The fill tube transports water from the water inlet valve to the ice maker. If the fill tube is misaligned or damaged, it can cause water to overflow. Check the fill tube for any obstructions or signs of damage. Clear any blockages and ensure that the fill tube is properly aligned to prevent overflow.
Clean or replace water inlet tube
Similar to a blocked or damaged fill tube, a clogged or damaged water inlet tube can contribute to ice maker overflow. Carefully remove the water inlet tube and check for any debris or blockages. Clean the tube thoroughly or replace it if there are signs of damage or clogging. A clear water inlet tube helps prevent overflow issues.
This image is property of empire-s3-production.bobvila.com.
Ice Melting Prematurely
Check freezer temperature
If your ice is melting prematurely, the first step is to check the temperature of your freezer. If the freezer temperature is too high, the ice cubes may start melting. Ensure that the freezer is set to the recommended temperature range of 0 to 5 degrees Fahrenheit (-18 to -15 degrees Celsius). Adjust the freezer settings as needed to maintain the optimum temperature.
Inspect thermostat
The thermostat monitors and maintains the temperature in the freezer. If the thermostat is faulty or not calibrated correctly, it can lead to premature ice melting. Inspect the thermostat for any signs of damage or malfunction. Replace the thermostat if necessary to ensure proper temperature control and prevent ice from melting prematurely.
Examine ice bin
Check the ice bin for any cracks, damage, or improper sealing. A damaged or improperly sealed ice bin can allow warm air into the ice maker, causing the ice to melt prematurely. If you notice any issues with the ice bin, repair or replace it to maintain the desired ice quality and prevent premature melting.
Verify defrost timer
The defrost timer controls the defrosting cycle of the freezer. If the defrost timer is faulty or not functioning properly, it can lead to temperature fluctuations and premature ice melting. Verify the defrost timer for any signs of damage or malfunction. Replace the timer if necessary to ensure proper defrost cycles and prevent ice from melting prematurely.
Clean or replace condenser coils
Dirty or clogged condenser coils can cause the freezer to overheat, leading to premature ice melting. Thoroughly clean the condenser coils to remove any dust, dirt, or debris. If the coils are damaged or heavily corroded, they may need to be replaced. Properly functioning condenser coils help maintain the freezer temperature and prevent premature ice melting.
Ice Tastes or Smells Bad
Check water quality
If your ice has an unpleasant taste or smell, it may be due to the water source. Poor water quality can affect the taste and odor of the ice cubes. Test the water quality, both from the tap and the ice maker’s source, to identify any issues. Consider installing a water filtration system or contacting a professional to address any water quality concerns.
Inspect water filter
A clogged or outdated water filter can contribute to the bad taste or odor of the ice cubes. Check the water filter and clean or replace it as needed. Regularly replacing the water filter ensures that impurities are filtered out, resulting in better-tasting and odor-free ice cubes.
Examine ice maker mold
The ice maker mold can accumulate bacteria or mold over time, leading to an unpleasant taste or odor. Remove the ice maker mold carefully and inspect it for any signs of contamination. Clean the mold thoroughly with warm water and a mild cleaning solution. Rinse it well before reinstalling to ensure that the ice cubes are free from any unwanted taste or smell.
Verify freezer temperature
Extreme freezer temperatures can affect the taste and odor of the ice cubes. Check the temperature settings of the freezer and ensure that they are within the recommended range. Adjust the settings if necessary to maintain the ideal freezer temperature for producing high-quality ice cubes.
Clean or replace ice mold
If the ice mold is heavily stained or damaged, it may contribute to the bad taste or smell of the ice cubes. Clean the ice mold thoroughly with warm water and a mild cleaning solution. If the mold is beyond cleaning, consider replacing it to ensure the production of fresh and clean-tasting ice cubes.
By following these troubleshooting steps, you can address common issues with built-in ice makers and enjoy a fully functional ice maker that produces high-quality ice. Remember to exercise caution when working with electrical components or moving parts, and if you are uncertain or unable to resolve the problem yourself, it is always advisable to seek professional assistance.
